はじめに
主に組み込みソフトウェア開発を生業としているため、フロントエンド開発には縁がなかったのですが、ここ1年仕事でNode.jsを触ってきたためフロントエンド開発にも興味が出てきて、Udemyの教材を買って黙々とtry & errorしました。
自分のような #React 初心者が手っ取り早く学ぶにはお勧めの教材 @Udemy 。とはいえ、この動画を見て手を動かすだけではもちろんダメで、それなりに深掘りして調べつつtry&errorしながら学習する必要はある。https://t.co/bHX62k3VYk
— takashi ando (@takashi7ando) 2018年11月23日
この教材では、CodeSandboxを使ってオンライン上にサクッと開発環境を構築するため、ぶっちゃけシェルとかコマンドとか触ったことがなくても学習を始めることができるんですが、その辺りの知識をある程度持っている人にとってはモヤっと感が残る内容となっています。
「実際の現場ではどうやって開発始めるんだ・・・?」
的な。
フロントエンド開発現場未経験者がその辺についても触れつつ学びながら製作した成果物とその過程を公開しようと思います。
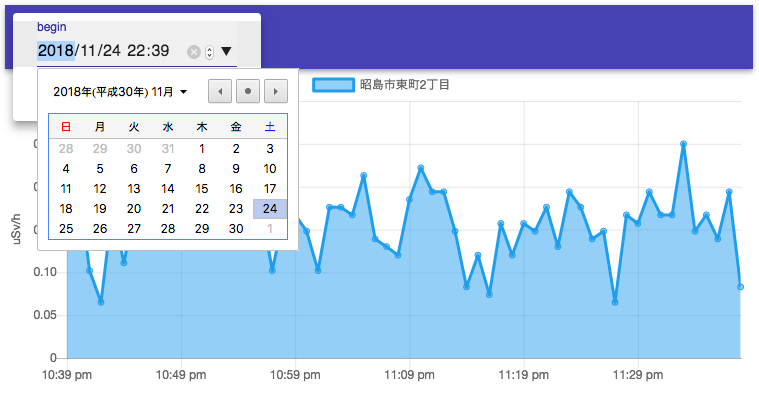
成果物イメージ
最終的にはこんな感じのものが出来上がります。自宅周辺の空間線量をありのままに定点観測し続けるデバイスのデータを可視化したものです。
使用する主なライブラリ、フレームワーク
センサデータを収集して永続化するバックエンド、そのデータを可視化するフロントエンドの両方をほぼJavaScriptで構成してますが、さすがにセンサ部は内部でArduinoと割り込みを使用しているので、C言語の知識も必要になります。
バックエンド側は長くなるので今回は割愛。
フロントエンド
バックエンド
Reactアプリケーション開発環境を構築する
Reactアプリケーションコードはコンパイル(トランスパイル)する必要があるため、その環境を構築する必要があります。
前提とする環境
開発環境としてのWindowsは除外。
nodeをインストールする
実行環境とパッケージ管理システムがないと何も始まらないので、整備します。
2018/11/24 現在、下記の通りnode v10がActive LTSとなっていますが、ここではv8を導入します。
| Release | Status | Codename | Initial Release | Active LTS Start | Maintenance LTS Start | End-of-life |
|---|---|---|---|---|---|---|
| 6.x | Maintenance LTS | Boron | 2016-04-26 | 2016-10-18 | 2018-04-30 | April 2019 |
| 8.x | Active LTS | Carbon | 2017-05-30 | 2017-10-31 | April 2019 | December 20191 |
| 10.x | Active LTS | Dubnium | 2018-04-24 | 2018-10-30 | April 2020 | April 2021 |
とはいえ、複数バージョンのnode環境を切り替えると後々便利なので、たびたび取り上げているanyenv経由でnodenvをインストールします。
$ anyenv install nodenv
$ exec -l $SHELL
$ nodenv install -l | grep -E '^\s*8\.'
  ...
  8.10.0
  8.11.0
  8.11.1
  8.11.2
  8.11.3
node 8系の最新は8.11.3のようなので、これをインストールします。
$ nodenv install 8.11.3
Reactアプリケーション雛形を作成する
nodeをインストールするとパッケージ管理システムnpmも勝手についてきます。まずはnpmでReactアプリケーション雛形生成コマンドをインストール、設定していきます。
Reactについておさらい
今更ですがおさらいです。
Reactは、JavaScriptでもHTMLでもない、JSXという独自のシンタックスでコードを書く必要があります。
class GeigerChart extends Component {
  ...
  render() {
    const { classes } = this.props;
    return (
      <div className={classes.areaChart}>
        <canvas ref="canvas" />
      </div>
    );
  }
}
JavaScriptでもHTMLでもないということは、そのままではブラウザが解釈できないので、JSXコードをコンパイル(トランスパイル)してブラウザが解釈できる形式に変換しないといけません。
そのトランスパイル環境を自前で組むのはとても大変なので、create-react-appコマンドで生成した環境を展開して流用します。
create-react-appコマンドを実行する
create-react-appコマンドのインストールは簡単です。
$ nodenv local 8.11.3
$ npm install -g create-react-app
オプション一覧は以下の通り。
$ create-react-app --help
Usage: create-react-app <project-directory> [options]
Options:
  -V, --version                            output the version number
  --verbose                                print additional logs
  --info                                   print environment debug info
  --scripts-version <alternative-package>  use a non-standard version of react-scripts
  --use-npm
  --use-pnp
  --typescript
  -h, --help                               output usage information
    Only <project-directory> is required.
    A custom --scripts-version can be one of:
      - a specific npm version: 0.8.2
      - a specific npm tag: @next
      - a custom fork published on npm: my-react-scripts
      - a local path relative to the current working directory: file:../my-react-scripts
      - a .tgz archive: https://mysite.com/my-react-scripts-0.8.2.tgz
      - a .tar.gz archive: https://mysite.com/my-react-scripts-0.8.2.tar.gz
    It is not needed unless you specifically want to use a fork.
    If you have any problems, do not hesitate to file an issue:
      https://github.com/facebook/create-react-app/issues/new
TypeScript版の雛形も生成できますが、今回は指定しません。keen-analysis.js等のライブラリに対応した型定義ファイルがなく、自前で書くのがめんどくさいので…。
Only <project-directory> is required. の通り、雛形のproject名のみ引数に指定してcreate-react-appコマンドを実行します。
$ create-react-app geiger-viewer
Creating a new React app in /Users/takashi/Development/geiger-viewer.
Installing packages. This might take a couple of minutes.
Installing react, react-dom, and react-scripts...
[fsevents] Success: "/Users/takashi/Development/geiger-viewer/node_modules/fsevents/lib/binding/Release/node-v57-darwin-x64/fse.node" already installed
Pass --update-binary to reinstall or --build-from-source to recompile
+ react-scripts@2.1.1
+ react@16.6.3
+ react-dom@16.6.3
added 1768 packages in 94.867s
Initialized a git repository.
Success! Created test at /Users/takashi/Development/geiger-viewer
Inside that directory, you can run several commands:
  npm start
    Starts the development server.
  npm run build
    Bundles the app into static files for production.
  npm test
    Starts the test runner.
  npm run eject
    Removes this tool and copies build dependencies, configuration files
    and scripts into the app directory. If you do this, you can’t go back!
We suggest that you begin by typing:
  cd test
  npm start
Happy hacking!
geiger-viewerディレクトリ下にコードと設定ファイル一式が生成されたので、確認しましょう。
$ tree -L 1 geiger-viewer/
geiger-viewer/
├── README.md
├── node_modules
├── package-lock.json
├── package.json
├── public
└── src
これで雛形となるコードはできたんですが、IE等の古いブラウザを使っている人はまだまだ多いので(涙)、これに対応するための設定を追加する必要があります。
でもその設定ファイルは、現段階では隠蔽されているので、展開する必要があります。
先ほどのcreate-react-appコマンドオプション一覧に表示されていた、これですね。
  npm run eject
    Removes this tool and copies build dependencies, configuration files
    and scripts into the app directory. If you do this, you can’t go back!
やってみると、
$ npm run eject
> geiger-viewer@0.1.0 eject /Users/takashi/Development/geiger-viewer
> react-scripts eject
? Are you sure you want to eject? This action is permanent. Yes
Ejecting...
Are you sure you want to eject? This action is permanent. (後戻りできないけど本当にいいの?)と聞いてくるので、yを入力します。すると…
Copying files into /Users/takashi/Development/temp/geiger-viewer
  Adding /config/env.js to the project
  Adding /config/paths.js to the project
  Adding /config/webpack.config.dev.js to the project
  Adding /config/webpack.config.prod.js to the project
  Adding /config/webpackDevServer.config.js to the project
  Adding /config/jest/cssTransform.js to the project
  Adding /config/jest/fileTransform.js to the project
  Adding /scripts/build.js to the project
  Adding /scripts/start.js to the project
  Adding /scripts/test.js to the project
Updating the dependencies
  Removing react-scripts from dependencies
  Adding @babel/core to dependencies
  Adding @svgr/webpack to dependencies
  Adding babel-core to dependencies
  Adding babel-eslint to dependencies
  Adding babel-jest to dependencies
  Adding babel-loader to dependencies
  Adding babel-plugin-named-asset-import to dependencies
  Adding babel-preset-react-app to dependencies
  Adding bfj to dependencies
  Adding case-sensitive-paths-webpack-plugin to dependencies
  Adding chalk to dependencies
  Adding css-loader to dependencies
  Adding dotenv to dependencies
  Adding dotenv-expand to dependencies
  Adding eslint to dependencies
  Adding eslint-config-react-app to dependencies
  Adding eslint-loader to dependencies
  Adding eslint-plugin-flowtype to dependencies
  Adding eslint-plugin-import to dependencies
  Adding eslint-plugin-jsx-a11y to dependencies
  Adding eslint-plugin-react to dependencies
  Adding file-loader to dependencies
  Adding fork-ts-checker-webpack-plugin-alt to dependencies
  Adding fs-extra to dependencies
  Adding html-webpack-plugin to dependencies
  Adding identity-obj-proxy to dependencies
  Adding jest to dependencies
  Adding jest-pnp-resolver to dependencies
  Adding jest-resolve to dependencies
  Adding mini-css-extract-plugin to dependencies
  Adding optimize-css-assets-webpack-plugin to dependencies
  Adding pnp-webpack-plugin to dependencies
  Adding postcss-flexbugs-fixes to dependencies
  Adding postcss-loader to dependencies
  Adding postcss-preset-env to dependencies
  Adding postcss-safe-parser to dependencies
  Adding react-app-polyfill to dependencies
  Adding react-dev-utils to dependencies
  Adding resolve to dependencies
  Adding sass-loader to dependencies
  Adding style-loader to dependencies
  Adding terser-webpack-plugin to dependencies
  Adding url-loader to dependencies
  Adding webpack to dependencies
  Adding webpack-dev-server to dependencies
  Adding webpack-manifest-plugin to dependencies
  Adding workbox-webpack-plugin to dependencies
Updating the scripts
  Replacing "react-scripts start" with "node scripts/start.js"
  Replacing "react-scripts build" with "node scripts/build.js"
  Replacing "react-scripts test" with "node scripts/test.js"
Configuring package.json
  Adding Jest configuration
  Adding Babel preset
  Adding ESLint configuration
Running npm install...
up to date in 18.573s
Ejected successfully!
Please consider sharing why you ejected in this survey:
  http://goo.gl/forms/Bi6CZjk1EqsdelXk1
webpackやbabel等のツール、ライブラリと共に、./config下に設定ファイルが展開されました。古いIEにもちゃんと対応するにはwebpackの設定ファイルを修正して@babel/polyfill をかけてやる必要があるんですが、長くなってきたので続きは次回。