これはなに?
以前作ったオフグリッドシステムの発電状況監視システムが、keen.io利用コスト増大によりストップしていたので、それを再開すべく自前でデータストレージとAPIサーバを用意してしまおうという試みの軌跡。
今のところざっくり以下構成を予定。今回は1.Django applicationの構築。
- Django application
- Rest Frameworkを利用してAPIを作る (今ここ)
- AWS EC2,RDS,...
- Django applicationを稼働させる
- Logger application
- 自宅で稼働中のTS-MPPT60が頑張る
まずは環境整備
anyenv経由で入れたpyenvで最新(に近い)Pythonをインストールして使う。
anyenv install pyenv
pyenv install -l | grep -E '^\s*\d' | tail
  3.8.0
  3.8-dev
  3.8.1
  3.8.2
  3.8.3
  3.8.4
  3.8.5
  3.9.0rc1
  3.9-dev
  3.10-dev

pyenv install 3.8.5
pyenv local 3.8.5
またはシステムにインストールされたPythonでpipenvを入れて、それ経由で最新(に近い)Pythonをインストールして使うでも良い。npmぽいパッケージ管理ができて便利なので、こちらの方がおすすめ。
ついでにDjangoやREST framework、Lint系ツールも入れておく。
pyenv local system
pip3 install pipenv
pipenv --python 3.8.5
pipenv install django~=3.1
pipenv install djangorestframework~=3.11
pipenv install --dev autopep8 flake8
ここまでくると、pipenvコマンドがPipfileとPipfile.lockが生成されているはず。両方ともgit管理しておき、特にPipfile.lockがあると後で他の開発環境に移行した際に、
pipenv sync
とするだけで依存パッケージインストールなどが完了するので、おすすめ。
また、Pipfileの最後に以下のようなコマンドを登録しておくと後々便利。これはnodeのnpmで言うところのpackage.jsonに定義するscriptsと同じなんだけど、こちらのQiita記事が詳しい。
[scripts]
lint = "flake8 ."
Django project雛形作成
まずはprojectの雛形を作る。
django-admin startproject solar_web_monitor .
上記コマンドを実行すると、以下ファイル群が生成されるので、漏れなくgit管理下に置く。
 manage.py                     |  22 +++++++++++++++
 solar_web_monitor/__init__.py |   0
 solar_web_monitor/asgi.py     |  16 +++++++++++
 solar_web_monitor/settings.py | 120 ++++++++++++++++++++++++++++++++++++++++++++++++++++++++++++++++++++++++++++++++
 solar_web_monitor/urls.py     |  21 ++++++++++++++
 solar_web_monitor/wsgi.py     |  16 +++++++++++
 6 files changed, 195 insertions(+)
デフォルトでは言語が英語、TimeZoneがUTCとなっているため、これをそれぞれ日本語と東京に変更する。変更するファイルはプロジェクト下のsettings.pyで、今回で言うとsolar_web_monitor/settings.pyの下記変数にあたる。
LANGUAGE_CODE = 'ja'
TIME_ZONE = 'Asia/Tokyo'
Django application雛形作成
次にProject配下にapplication雛形を作る。ここではとりあえずstorageアプリケーションとした。
python manage.py startapp storage
今回生成されたファイル群も漏れなくgit管理下に置く。
 storage/__init__.py            | 0
 storage/admin.py               | 3 +++
 storage/apps.py                | 5 +++++
 storage/migrations/__init__.py | 0
 storage/models.py              | 3 +++
 storage/tests.py               | 3 +++
 storage/views.py               | 3 +++
 8 files changed, 18 insertions(+)
作成したapplicationをprojectに登録する必要がある。具体的には、追加したstorage applicaitonのapps.pyに宣言されたStorageConfigクラスへのパス 'storage.apps.StorageConfig' を、プロジェクト配下solar_web_monitor/settings.pyの下記変数に追加する。
INSTALLED_APPS = [
    'django.contrib.admin',
    'django.contrib.auth',
    'django.contrib.contenttypes',
    'django.contrib.sessions',
    'django.contrib.messages',
    'django.contrib.staticfiles',
    'storage.apps.StorageConfig',
]
INSTALLED_APPSとは?
Django documentationによると以下の通りで、application configuration classを一元管理するリストということみたい。
A list of strings designating all applications that are enabled in this Django installation. Each string should be a dotted Python path to:
https://docs.djangoproject.com/en/3.1/ref/settings/#installed-apps
* an application configuration class (preferred), or
* a package containing an application.
Use the application registry for introspection
Your code should never accessINSTALLED_APPSdirectly. Usedjango.apps.appsinstead.
Application names and labels must be unique inINSTALLED_APPS
Applicationnames— the dotted Python path to the application package — must be unique. There is no way to include the same application twice, short of duplicating its code under another name.
Applicationlabels— by default the final part of the name — must be unique too. For example, you can’t include bothdjango.contrib.authandmyproject.auth. However, you can relabel an application with a custom configuration that defines a differentlabel.
These rules apply regardless of whetherINSTALLED_APPSreferences application configuration classes or application packages.
今回追加したstorage applicaitonのapps.pyを覗いてみると、以下のようになっており、
from django.apps import AppConfig


class StorageConfig(AppConfig):
    name = 'storage'
AppConfigの型情報は以下の通りで、python manage.py startappコマンドで生成した雛形はnameのみオーバーライドしている模様。
class AppConfig:
    name: str = ...
    module: Optional[Any] = ...
    apps: Optional[Apps] = ...
    label: str = ...
    verbose_name: str = ...
    path: str = ...
    models_module: Optional[str] = ...
    models: Dict[str, Type[Model]] = ...
    def __init__(self, app_name: str, app_module: Optional[Any]) -> None: ...
    @classmethod
    def create(cls, entry: str) -> AppConfig: ...
    def get_model(self, model_name: str, require_ready: bool = ...) -> Type[Model]: ...
    def get_models(self, include_auto_created: bool = ..., include_swapped: bool = ...) -> Iterator[Type[Model]]: ...
    def import_models(self) -> None: ...
    def ready(self) -> None: ...
AppConfigクラスの詳細はDjango documentationのApplicationsに記載されている。For application authorsにはverbose_nameなどをオーバーライドして使用する旨が、For application usersにはINSTALLED_APPSにConfigurationを追加する旨が、それぞれ記載されている。
For application users
https://docs.djangoproject.com/en/3.1/ref/applications/
If you’re using “Rock ’n’ roll” in a project calledanthology, but you want it to show up as “Jazz Manouche” instead, you can provide your own configuration:
...
For application authors
If you’re creating a pluggable app called “Rock ’n’ roll”, here’s how you would provide a proper name for the admin:
...
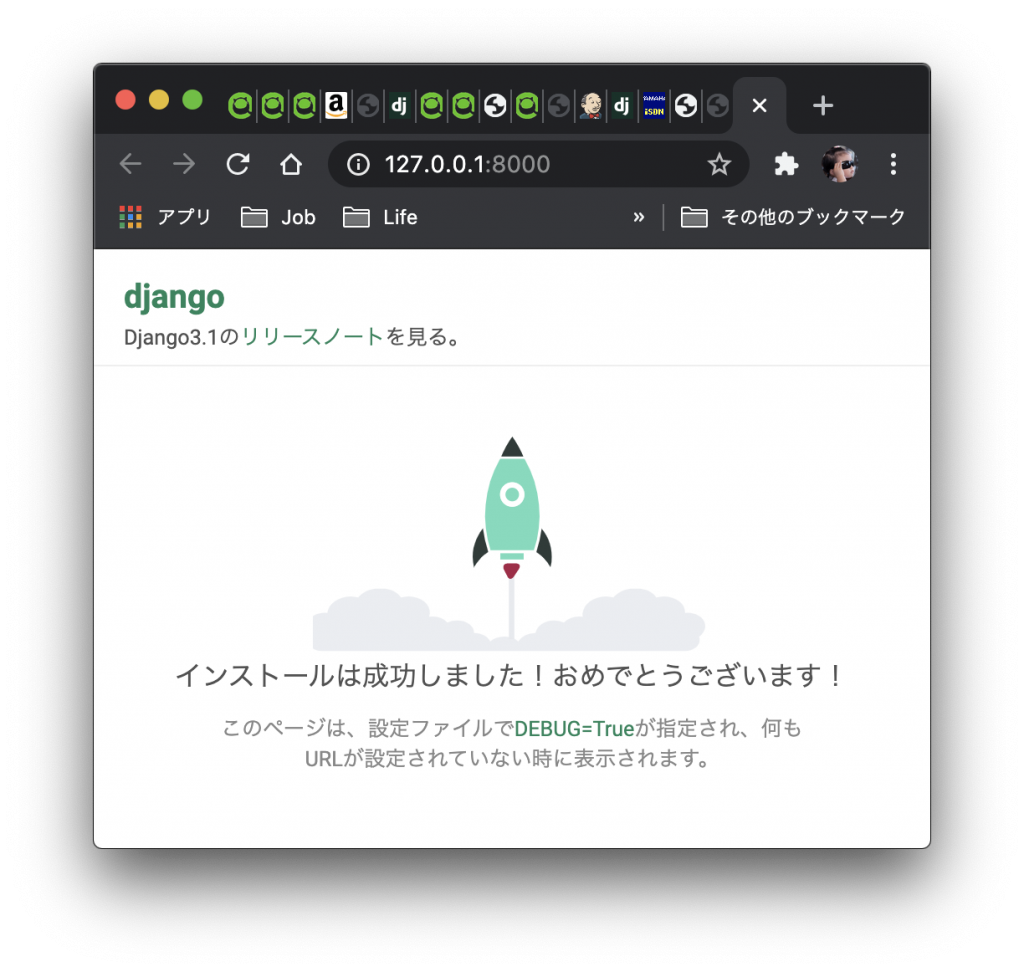
動作確認
とりあえずサーバとして起動することが可能。以下のように起動して、ブラウザでhttp://127.0.0.1:8000/にアクセスしてみると…
$ pipenv shell
$ python manage.py runserver
Watching for file changes with StatReloader
Performing system checks...

System check identified no issues (0 silenced).

You have 18 unapplied migration(s). Your project may not work properly until you apply the migrations for app(s): admin, auth, contenttypes, sessions.
Run 'python manage.py migrate' to apply them.
October 11, 2020 - 08:28:04
Django version 3.1.2, using settings 'solar_web_monitor.settings'
Starting development server at http://127.0.0.1:8000/
Quit the server with CONTROL-C.
こうなる。もちろん、このapplicationはまだ何もできない。
Django application管理者の作成
先ほど起動したDjango applicationは、バックにDBを持たないので管理者も何もないため、まずは管理ユーザを作成する。
Migration実行
runserverコマンド実行時の以下ログが示すように、まずはMigration (DBを作成)する必要がある。
You have 18 unapplied migration(s). Your project may not work properly until you apply the migrations for app(s): admin, auth, contenttypes, sessions.
以下コマンドでMigrationを実行する。
$ python manage.py migrate
Operations to perform:
  Apply all migrations: admin, auth, contenttypes, sessions
Running migrations:
  Applying contenttypes.0001_initial... OK
  Applying auth.0001_initial... OK
  Applying admin.0001_initial... OK
  Applying admin.0002_logentry_remove_auto_add... OK
  Applying admin.0003_logentry_add_action_flag_choices... OK
  Applying contenttypes.0002_remove_content_type_name... OK
  Applying auth.0002_alter_permission_name_max_length... OK
  Applying auth.0003_alter_user_email_max_length... OK
  Applying auth.0004_alter_user_username_opts... OK
  Applying auth.0005_alter_user_last_login_null... OK
  Applying auth.0006_require_contenttypes_0002... OK
  Applying auth.0007_alter_validators_add_error_messages... OK
  Applying auth.0008_alter_user_username_max_length... OK
  Applying auth.0009_alter_user_last_name_max_length... OK
  Applying auth.0010_alter_group_name_max_length... OK
  Applying auth.0011_update_proxy_permissions... OK
  Applying auth.0012_alter_user_first_name_max_length... OK
  Applying sessions.0001_initial... OK
このコマンドは、solar_web_monitor/settings.pyのDATABASES設定に従い、DB tableを作成する。デフォルトのBackendはSQLite3、生成先はBASE_DIR下の db.sqlite3 となっているので、Migration実行後にlsコマンド等で確認すると db.sqlite3 ファイルが確認できる。
DATABASES = {
    'default': {
        'ENGINE': 'django.db.backends.sqlite3',
        'NAME': BASE_DIR / 'db.sqlite3',
    }
}
$ ls db.*
db.sqlite3
試しに db.sqplite3 の中身を覗いてみると、以下のようにMigration実行済みログが記録されていたりする。
$ sqlite3 db.sqlite3
sqlite> .tables
auth_group                  auth_user_user_permissions
auth_group_permissions      django_admin_log
auth_permission             django_content_type
auth_user                   django_migrations
auth_user_groups            django_session
sqlite> select * from django_migrations;
1|contenttypes|0001_initial|2020-10-10 23:53:54.822684
2|auth|0001_initial|2020-10-10 23:53:54.837731
3|admin|0001_initial|2020-10-10 23:53:54.850714
4|admin|0002_logentry_remove_auto_add|2020-10-10 23:53:54.865741
5|admin|0003_logentry_add_action_flag_choices|2020-10-10 23:53:54.899030
6|contenttypes|0002_remove_content_type_name|2020-10-10 23:53:54.921581
7|auth|0002_alter_permission_name_max_length|2020-10-10 23:53:54.935835
8|auth|0003_alter_user_email_max_length|2020-10-10 23:53:54.950635
9|auth|0004_alter_user_username_opts|2020-10-10 23:53:54.965674
10|auth|0005_alter_user_last_login_null|2020-10-10 23:53:54.979275
11|auth|0006_require_contenttypes_0002|2020-10-10 23:53:54.981283
12|auth|0007_alter_validators_add_error_messages|2020-10-10 23:53:54.992594
13|auth|0008_alter_user_username_max_length|2020-10-10 23:53:55.002950
14|auth|0009_alter_user_last_name_max_length|2020-10-10 23:53:55.013722
15|auth|0010_alter_group_name_max_length|2020-10-10 23:53:55.024352
16|auth|0011_update_proxy_permissions|2020-10-10 23:53:55.032315
17|auth|0012_alter_user_first_name_max_length|2020-10-10 23:53:55.043150
18|sessions|0001_initial|2020-10-10 23:53:55.046499
createsuperuserコマンド実行
以下コマンドを実行すると、管理ユーザを作成できる。
$ python manage.py createsuperuser
ユーザー名 (leave blank to use 'takashi'):
メールアドレス: xxx@example.com
Password:
Password (again):
Superuser created successfully.
これも同様にdb.sqlite3に記録されていることがわかる。
$ sqlite3 db.sqlite3
SQLite version 3.28.0 2019-04-15 14:49:49
Enter ".help" for usage hints.
sqlite> select * from auth_user;
1|pbkdf2_sha256$216000$1DWvvuuF0y4R$ZQsZUSU9QBdZlcQPZ/lKigkkS6ccJqu1DJn1RhhPIt4=||1|takashi||xxx@example.com|1|1|2020-10-11 00:13:57.001539|
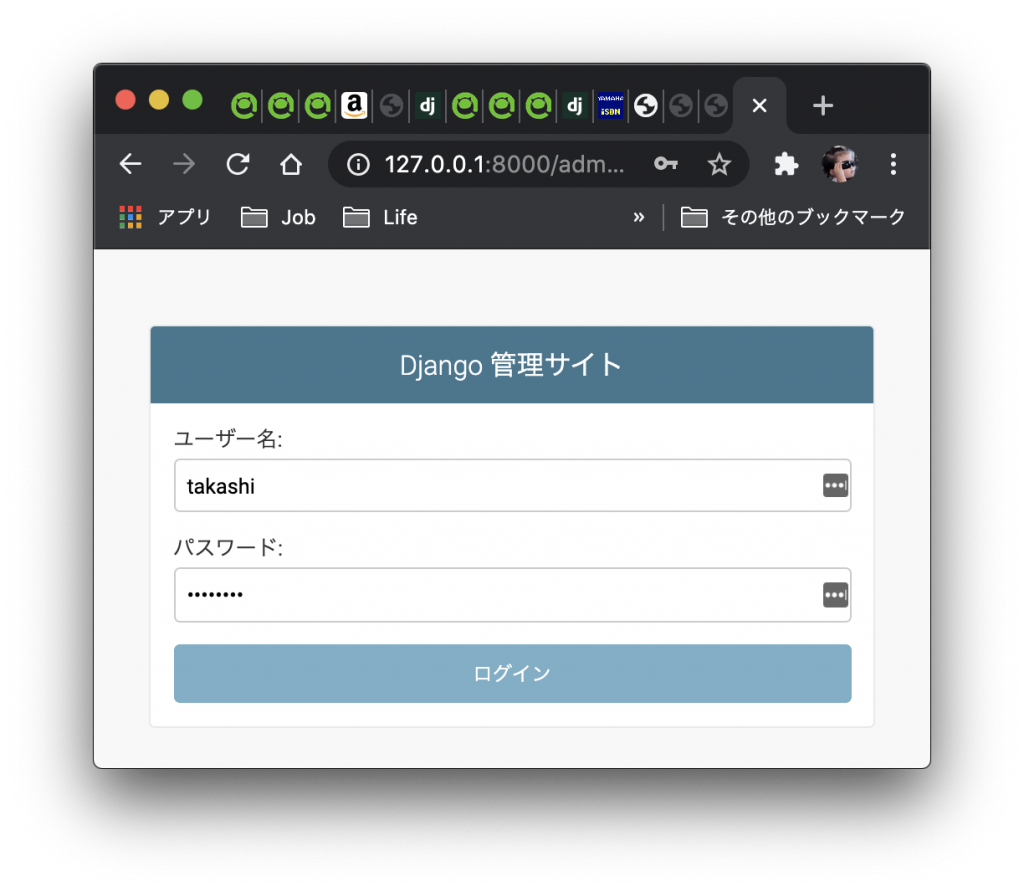
動作確認
ここまでで、Django applicationの管理画面にログインすることができる。試しに以下ログのURLに admin/login を加え、 http://127.0.0.1:8000/admin/login/ にアクセスしてみると、
$ python manage.py runserver
Watching for file changes with StatReloader
Performing system checks...

System check identified no issues (0 silenced).
October 11, 2020 - 09:19:03
Django version 3.1.2, using settings 'solar_web_monitor.settings'
Starting development server at http://127.0.0.1:8000/
Quit the server with CONTROL-C.
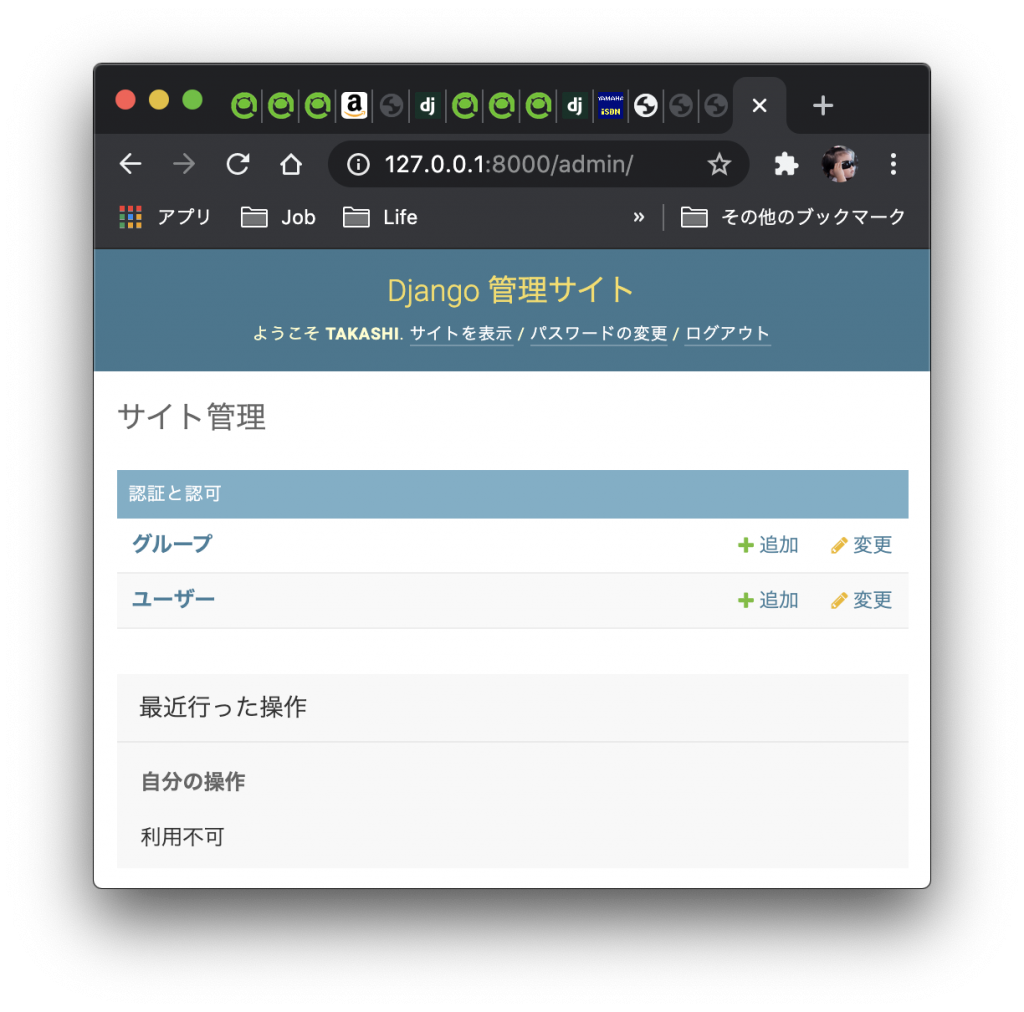
こうなる。createsuperuser コマンド実行時に指定したユーザ名とパスワードを入力してログインすると、
こうなる。ユーザやグループの設定といった基本操作しかできない。
まとめ
長くなってきたので、続きはまた次回。
次はModel(DBのTable、というよりRecordの定義のようなものと理解している)を作成してMigrationまでしたい。